The Compleat ATtiny13 LED Flasher: Part 1 - Setup, Hardware and a Basic Solution
This is the first part of three in attempting to explain how to make the ATtiny13 flash a LED.
- Part 1: Setup, Hardware and A Basic Solution
- Part 2: Using Timer Interrupts
- Part 3: Low Power Mode
If you’re used to the user-friendliness of Arduino, getting started with bare bones AVRs can be hard work. I’d like to try to go slowly through the early steps and point out some of the information sources I used.
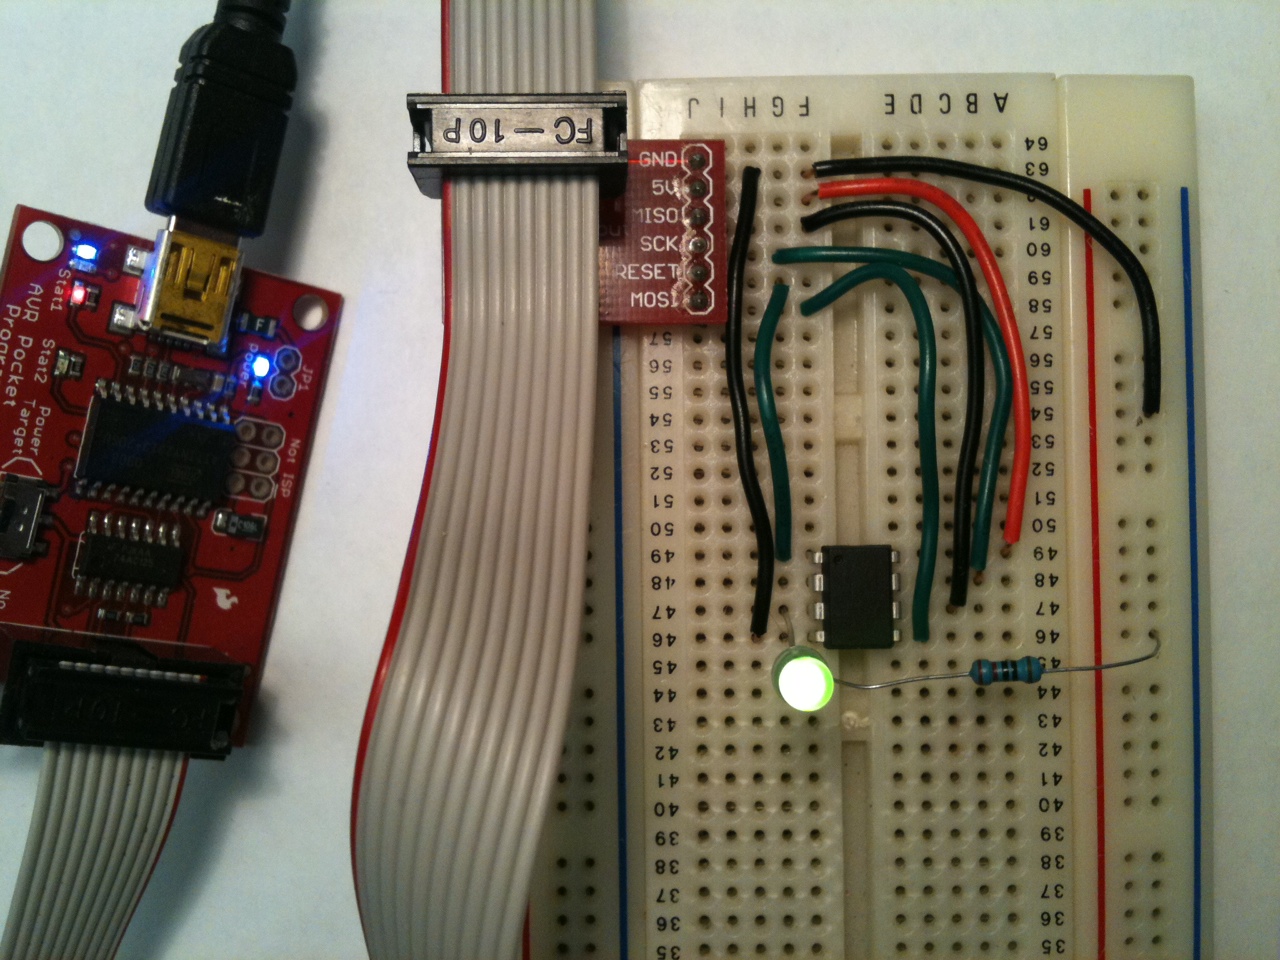 First, start at the end: here’s the final circuit. It has an ATtiny13, an LED and current-limiting resistor, a few wires, the programmer interface, and that’s about it. All it does is flash the LED on and off (very much like the classic 555 timer astable multivibrator but with the advantage of no passive components required). That’s it. Not much to it.
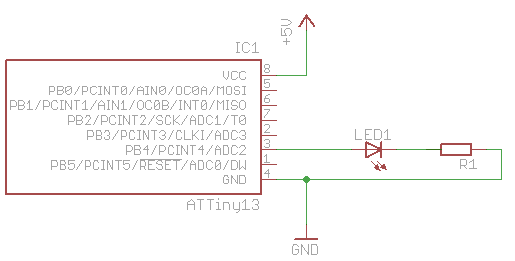
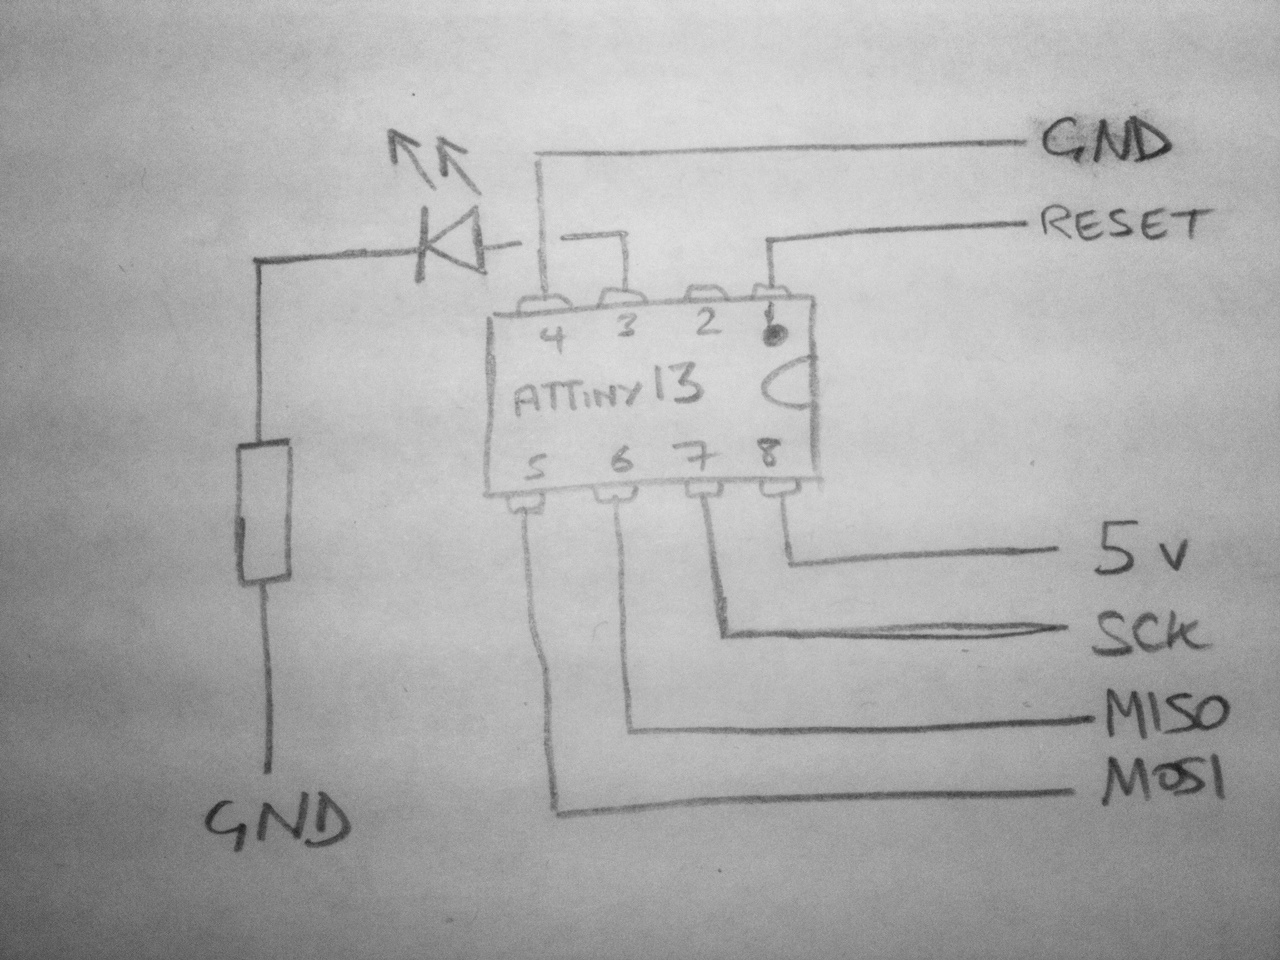 Also, here’s a quick sketch of a circuit diagram too – the inputs all come directly from the ISP interface from the programmer.
Ok, that’s the end result. Next: how to get there:
- Prerequisites (hardware and software)
- Build the circuit
- Write code
- Upload to microprocessor
Prerequisites
You need a programmer (e.g. Pocket Programmer, Adafruit’s USBtinyISP, any number of others, or even use yourarduino), a way to interface your programmer to your computer (a USB cable would be normal), and a way to interface your programmer to the ATtiny (ISP headers are normal, and here’s a picture of the pinout of the 6-pin header).
Software-wise, there are also myriad choices. There are different solutions for Windows, Mac and Linux. I’ve only tried a couple of Windows options to date.
Since there are so many options, I’d recommend finding a set of hardware and software that matches your existing equipment and budget that has a decent amount of documentation for troubleshooting. If you can’t find much out about how to get programmer X working on your computer, try another programmer.
There are more detailed instructions about my tool chain for compiling and programming the chip in the dice post. I’m using a Pocket Programmer, and WinAVR.
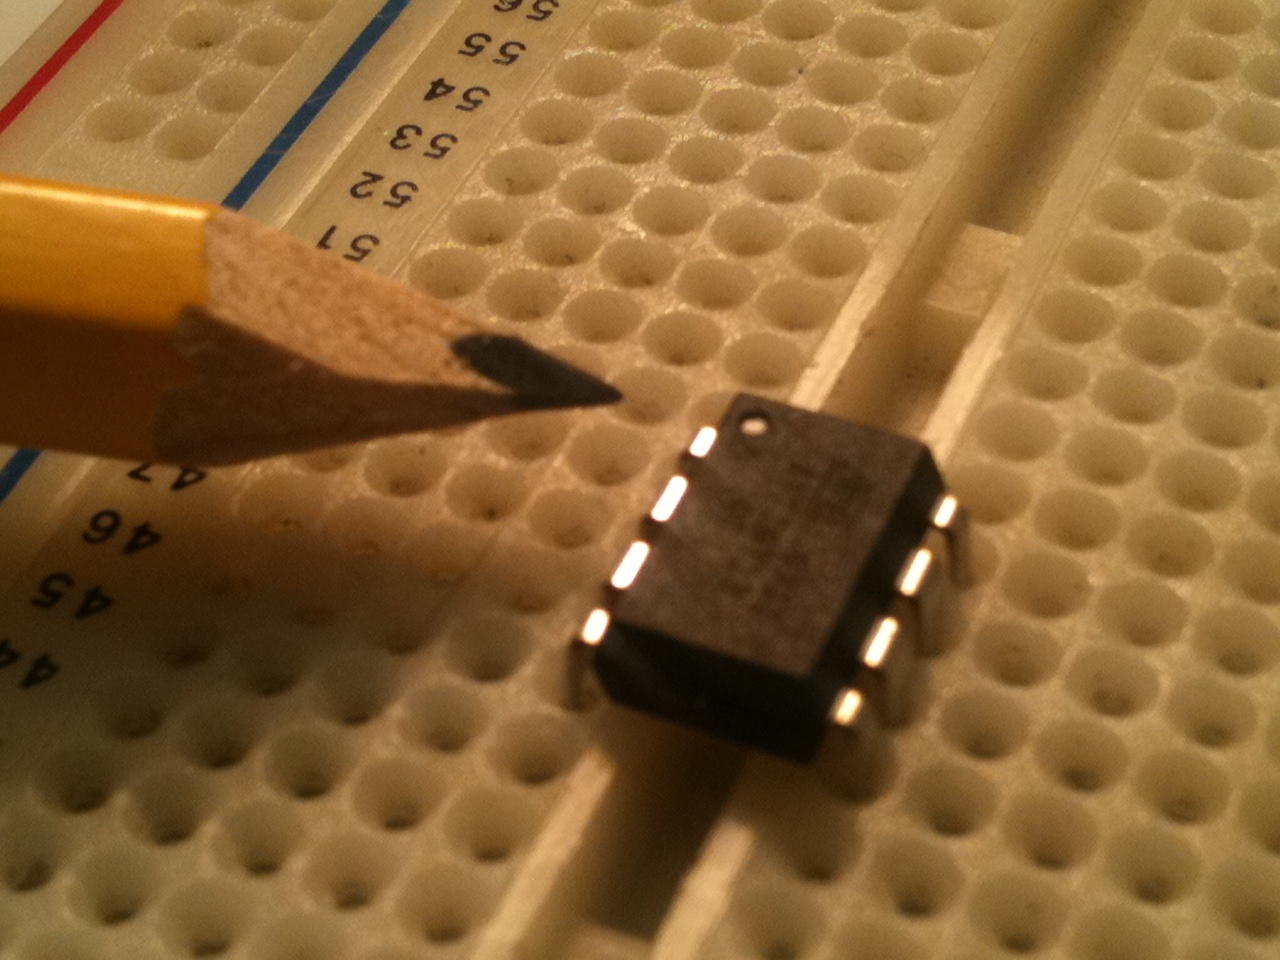
Build Plug the microprocessor into your breadboard. There’s a notch or a dot at one end of the package to indicate the top, or the position of pin 1 (pointed to in the photo). Pay attention to which way round the chip is! The rest of the pins are numbered counter-clockwise from pin 1.
If you have a nice breakout board for your ISP connector, plug it into the breadboard, and start working from that. Otherwise, refer to the pinout for the ISP and plug wires directly into the socket.

Connect each of the signals from the programmer to your ATtiny – each of MISO, MOSI, SCK, GND, VCC and RESET. Look at the datasheet for the ATtiny13to see the pinout (page 2).
(I have a printout of tinkerlog.com’s microcontroller cheat sheet on my desk. It has pinouts of most common ATtiny and ATmega chips, and ISP headers, and I’m constantly referring to it.)
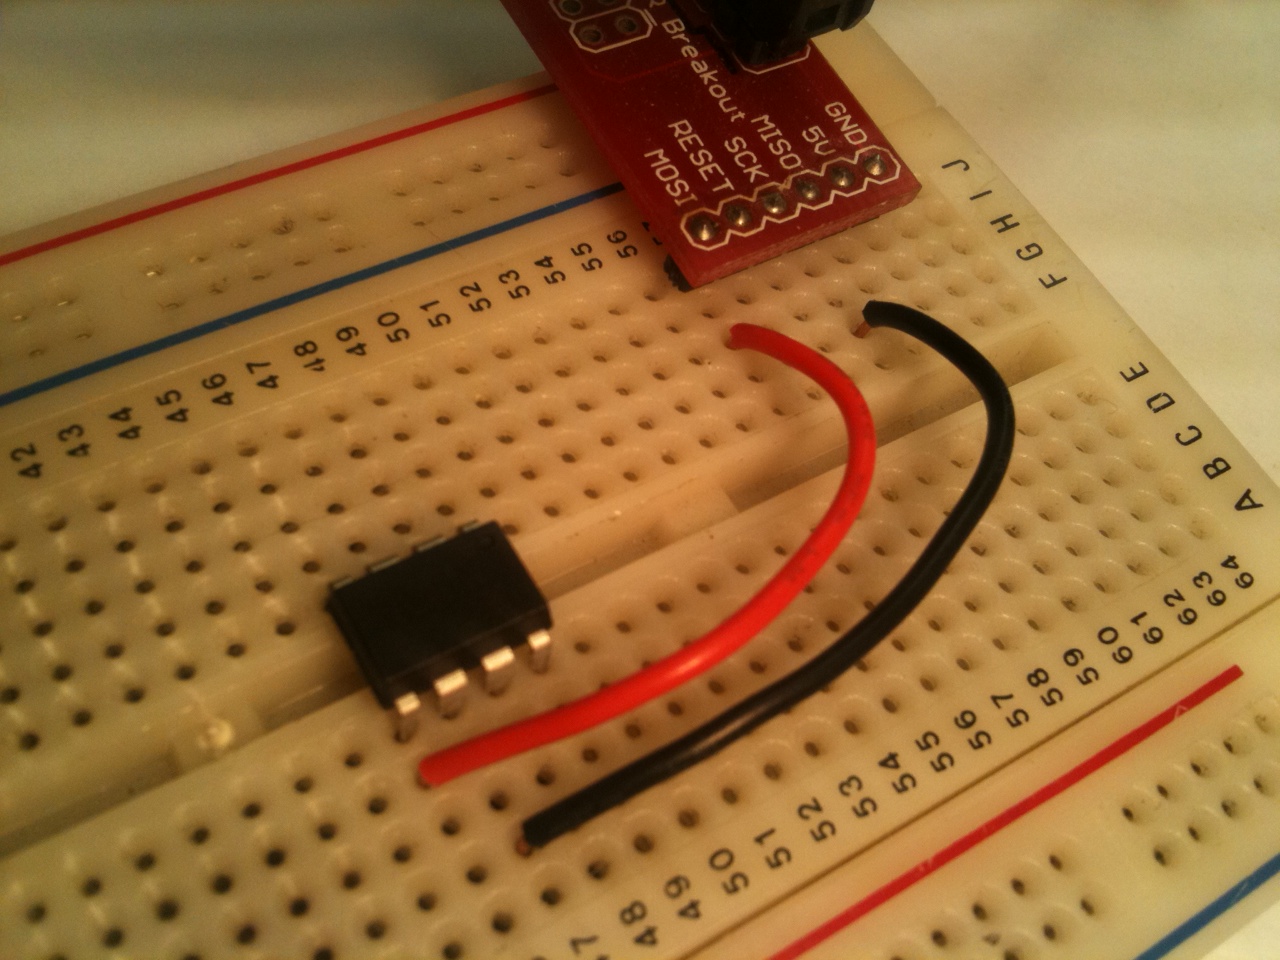
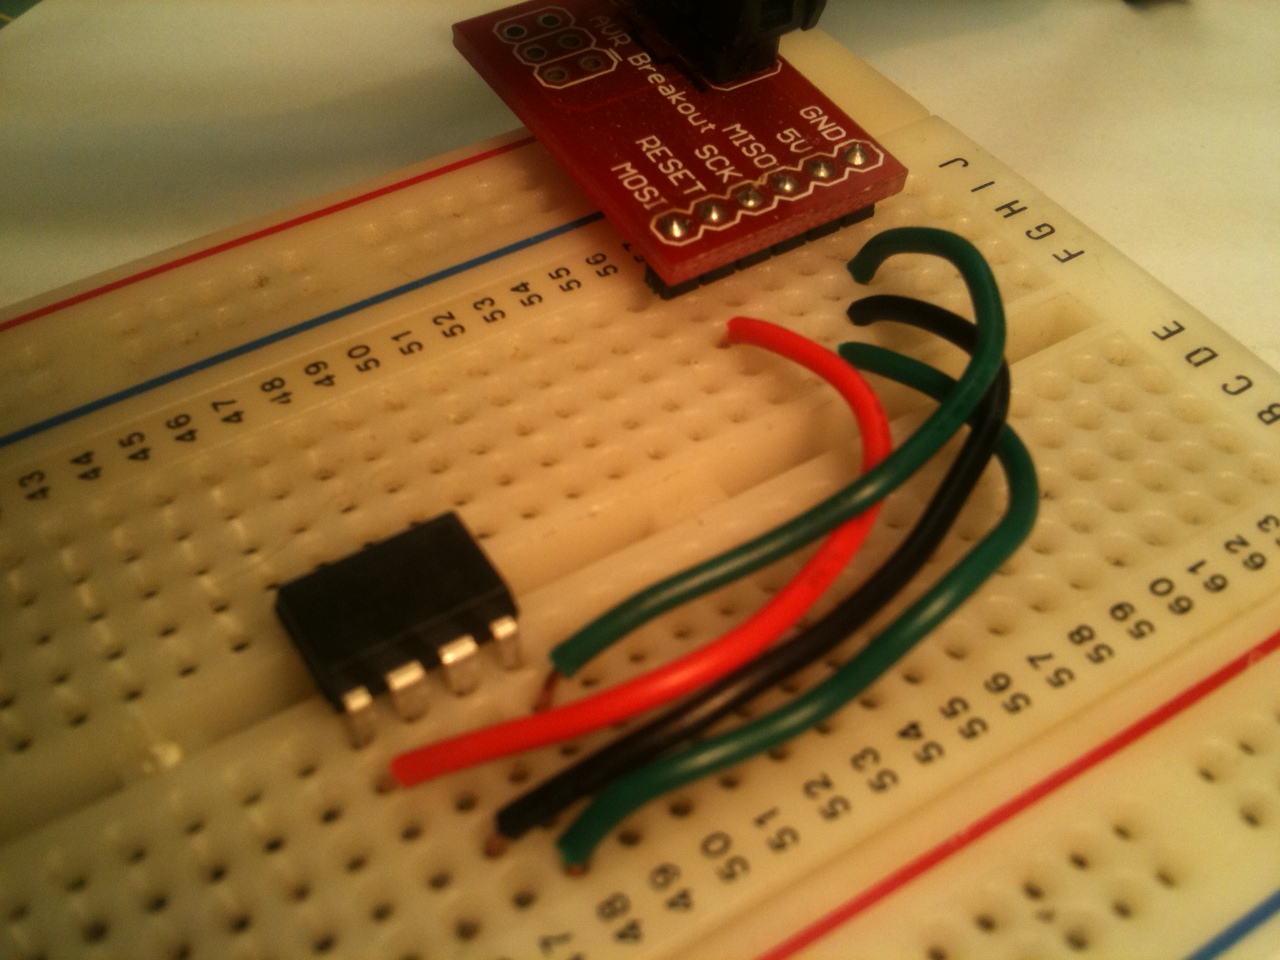
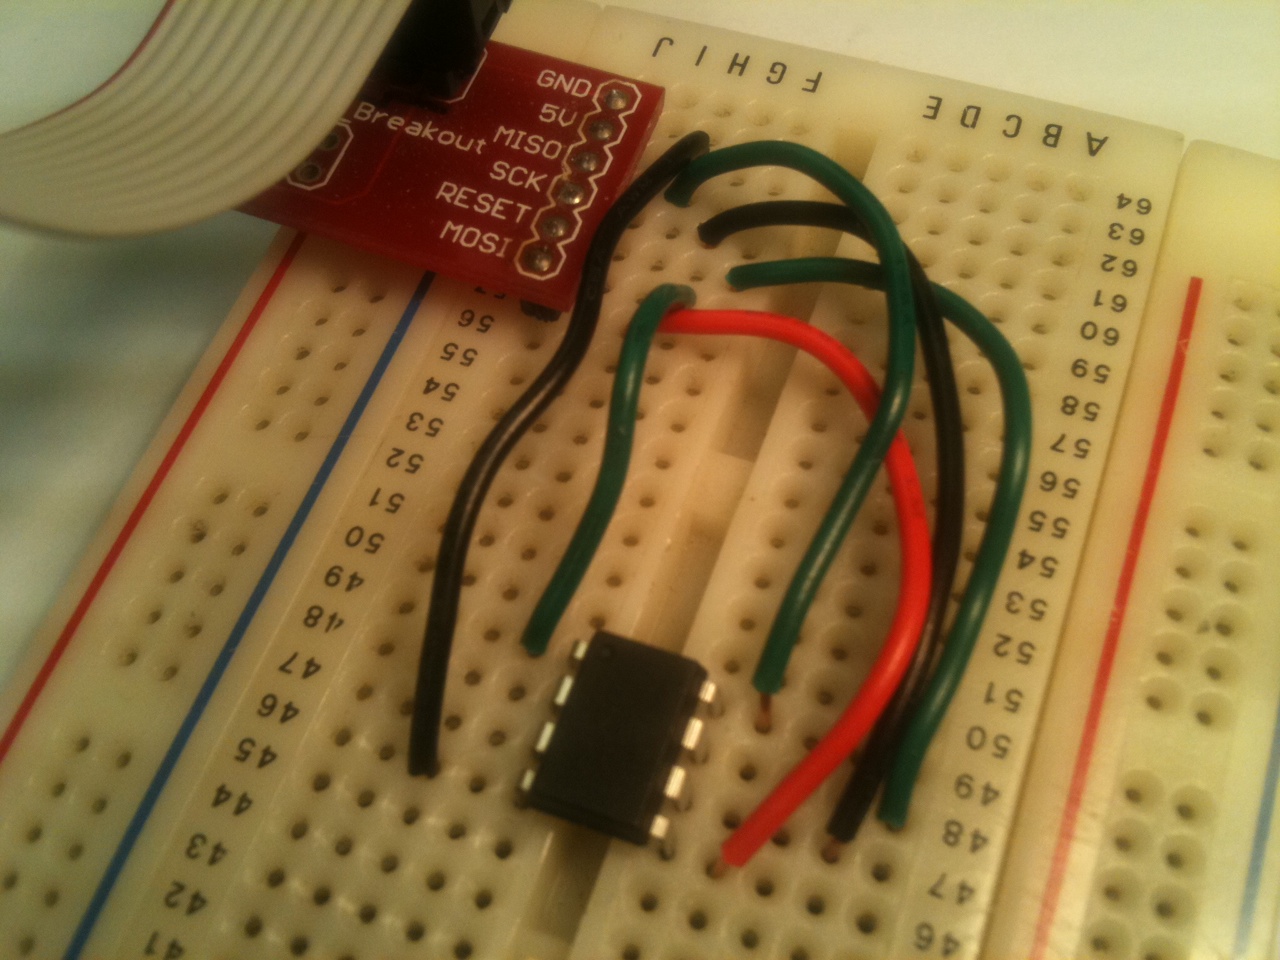
I want to source current for the LED from the ATtiny, and sink it to ground, so connect a supply line on the edge of the breadboard to GND from the ISP.

Connect the long lead of the LED to pin 3 of the ATtiny. Connect the short pin to an empty row. Into that row, connect the resistor (100 or 200 ohms should be fine) and then finally connect the other leg of the resistor to the ground channel.

Write the code
Paste this into your code editor:
/*
 * ATtiny13 LED Flasher
 * File: main.c
 */

#include <stdlib.h>
#include <util/delay.h>

int main(void)
{
    const int msecsDelayPost = 100;

    // Set up Port B pin 4 mode to output
    DDRB = 1<<DDB4;

    // Set up Port B data to be all low
    PORTB = 0;

    while (1) {
        // Toggle Port B pin 4 output state
        PORTB ^= 1<<PB4;

        // Pause a little while
        _delay_ms (msecsDelayPost);
    }

    return 0;
}
Simple enough. Save the file as main.c, generate or customize a makefile, and at a command prompt type
make all. You should see something like the following:D:\Projects\AVR>make all
-------- begin --------
avr-gcc (WinAVR 20100110) 4.3.3
Copyright (C) 2008 Free Software Foundation, Inc.
This is free software; see the source for copying conditions. There is NO
warranty; not even for MERCHANTABILITY or FITNESS FOR A PARTICULAR PURPOSE.
Size before:
AVR Memory Usage
----------------
Device: attiny13
Program: 64 bytes (6.3% Full)
(.text + .data + .bootloader)
Data: 0 bytes (0.0% Full)
(.data + .bss + .noinit)
Compiling C: main.c
avr-gcc -c -mmcu=attiny13 -I. -gdwarf-2 -DF_CPU=1200000UL -Os -funsigned-char -f
unsigned-bitfields -fpack-struct -fshort-enums -Wall -Wstrict-prototypes -Wa,-ad
hlns=./main.lst -std=gnu99 -MMD -MP -MF .dep/main.o.d main.c -o main.o
Linking: main.elf
avr-gcc -mmcu=attiny13 -I. -gdwarf-2 -DF_CPU=1200000UL -Os -funsigned-char -funs
igned-bitfields -fpack-struct -fshort-enums -Wall -Wstrict-prototypes -Wa,-adhln
s=main.o -std=gnu99 -MMD -MP -MF .dep/main.elf.d main.o --output main.elf -Wl,-
Map=main.map,--cref -lm
Creating load file for Flash: main.hex
avr-objcopy -O ihex -R .eeprom -R .fuse -R .lock -R .signature main.elf main.hex
Creating load file for EEPROM: main.eep
avr-objcopy -j .eeprom --set-section-flags=.eeprom="alloc,load" \
--change-section-lma .eeprom=0 --no-change-warnings -O ihex main.elf mai
n.eep || exit 0
Creating Extended Listing: main.lss
avr-objdump -h -S -z main.elf > main.lss
Creating Symbol Table: main.sym
avr-nm -n main.elf > main.sym
Size after:
AVR Memory Usage
----------------
Device: attiny13
Program: 64 bytes (6.3% Full)
(.text + .data + .bootloader)
Data: 0 bytes (0.0% Full)
(.data + .bss + .noinit)
-------- end --------
D:\Projects\AVR>
Upload to microprocessor
Now the easy bit: plug the programmer into your computer, and type
make programat the command prompt. With any luck, you will see something likeD:\Projects\AVR>make program
avrdude -p attiny13 -P usb -c usbtiny -U flash:w:main.hex
avrdude: AVR device initialized and ready to accept instructions
Reading | ################################################## | 100% 0.34s
avrdude: Device signature = 0x1e9007
avrdude: NOTE: FLASH memory has been specified, an erase cycle will be performed
To disable this feature, specify the -D option.
avrdude: erasing chip
avrdude: reading input file "main.hex"
avrdude: input file main.hex auto detected as Intel Hex
avrdude: writing flash (64 bytes):
Writing | ################################################## | 100% 0.27s
avrdude: 64 bytes of flash written
avrdude: verifying flash memory against main.hex:
avrdude: load data flash data from input file main.hex:
avrdude: input file main.hex auto detected as Intel Hex
avrdude: input file main.hex contains 64 bytes
avrdude: reading on-chip flash data:
Reading | ################################################## | 100% 0.05s
avrdude: verifying ...
avrdude: 64 bytes of flash verified
avrdude: safemode: Fuses OK
avrdude done. Thank you.
D:\Projects\AVR>
…and the LED should start flashing!
Part 2 - Using Timer Interrupts
This is the second part of three in attempting to explain how to make the ATtiny13 flash a LED.
- Part 2: Using timer interrupts
- Part 3: Low power mode
So last time around, we made a LED flash. Of course there are other, more elegant ways to do it. In this post I’ll explore interrupts, and specifically the timer overflow interrupt. For this I’ll use the same circuit setup from the first article. If you’re reading this one independently, here’s a circuit diagram:
Interrupts
The structure of programs for these microcontrollers often takes a standard form:
#include <headers>

int main() {
   set_up_routine();

   while (1) {
      do_something_interesting();
   }
   return 1;
}
So once the code’s on the device, after power-up it enters
main(), runs whatever setup you want to do, then begins running in an infinite loop doing whatever it is you want the tiny guy to do.
In this model, say you want to get input from devices, you must poll them – that is, every so often your program must go out of its way to figure out whether an input pin has changed from high to low, or some other measurement. Now this can cause problems. For example:
#include <headers>

int isSwitchPressed();      // returns 1 if switch is currently pressed down, 0 otherwise

int main() {
   set_up_routine();

   while (1) {
      if (isSwitchPressed()) {
         do_something_that_takes_a_long_time();
      }
   }
   return 1;
}
Let’s say that our interesting thing was to play a fancy little light sequence on a LED. You press the switch, the LED does its thing (or whatever else is in
do_something_that_takes_a_long_time), that function returns and again we’re waiting for the switch to be pressed. This is all well and good. If the switch is not pressed, the function returns false, theif’s body is not evaluated, the while loop ends and restarts, and the code tests whether the switch is pressed.
But here’s the rub. Consider:
#include <headers>

int isSwitchPressed();      // returns 1 if switch is currently pressed down, 0 otherwise

int main() {
   set_up_routine();

   while (1) {
      if (isSwitchPressed()) {
         do_something_that_takes_a_long_time();
      } else {
         do_something_else_that_takes_a_long_time();
      }
   }
   return 1;
}
If the switch is not pressed,
do_something_else_that_takes_a_long_time() is executed. If you push the switch during the time this function is executing, nothing will happen. The microcontroller will not register that the switch was pressed, and you lose that event happening.
So what if you want a button press during
do_something_else_that_takes_a_long_time() to run the regulardo_something_that_takes_a_long_time() code? You could start testing the switch state indo_something_else_that_takes_a_long_time. No, just kidding. That would suck.
This is where interrupts come into play. They do what you might expect them to do – they interrupt the normal code execution. Interrupts can be triggered by different types of events. In the example above you may recognize that a hardware-based interrupt might come to the rescue. Interrupts can also be generated by the microcontroller’s own internal systems, or by your code itself. These are called interrupt vectors. A list of the interrupt vectors for the ATtiny13 is listed in §9.1 in the ATtiny13 datasheet (p. 45).
When an interrupt happens, your way to instruct the µc to do something is through an interrupt handler, aka interrupt service routine, aka ISR. It looks just like a regular function, but you don’t call it directly from your code; it gets executed whenever an interrupt occurs. Once your ISR has completed execution, the program counter jumps back to right where it left of from in your
main() loop (or wherever it was when the interrupt was raised) and carries on running.
More pseudocode:
#include <headers>

ISR(interrupt_vector_caused_by_switch_press) {
   do_something_that_takes_a_long_time();
}

int main() {
   set_up_routine();

   while (1) {
      do_something_else_that_takes_a_long_time();
   }
   return 1;
}
So if the button is pressed, and interrupt is raised and our ISR is called. No matter where the program counter is when you press the button,
do_something_that_takes_a_long_time() will get called within a few clock cycles. If you haven’t pressed the button then all that gets executed is do_something_else_that_takes_a_long_time().
OK, you get it, enough theory and pseudocode. Moving on…
A word of warning: interrupts give you ways to do all kinds of weird things. Check out this and this for just a hint of the perils that await you!
Implementing Interrupts on ATtiny13 with AVR Libc
_There’s more than one way to skin a cat. My preferred method is using the AVR Libc code, and the avr-gcc C compiler toolchain, and that’s exclusively what I’ll focus on. _
I’m getting down to brass tacks and jumping around the datasheet a bit here.
The ATtiny13 datasheet §9.1 lists the Timer/Counter Overflow interrupt vector. Then reading §11.7.1, you learn that in its normal mode, the counter counts upwards, and once it gets to the “top” (there’s only so many bits allocated to store the counter value) it resets back to zero and the
TOV0 bit is set. §11.9.6 says that if you enable the Timer/Counter0 Overflow Interrupt by setting the TOIE0 bit to 1 in the TIMSK0 register and interrupts are enabled (“the I-bit in the Status Register is set”), whenever the TOV0 bit is set, the interrupt will be raised.
The timer is what we’re using to generate our interrupts. It’s an 8-bit register, incremented once per clock tick (unless prescaled – see later). Since it’s only an 8-bit register its maximum value is 255, therefore once every 256 clock cycles the timer reaches its maximum value and resets back to zero. If we set up the device properly, when this occurs the Timer/Counter0 Overflow Interrupt will be generated, and we can write a ISR to respond to this interrupt, and flash our timer.
“256 clock cycles?” I hear you ask. ”That’s not very long.“ We could add a counter variable and toggle the LED once the counter reaches a certain number of overflows. That might work. The clock runs at around 9.6MHz by default (§6.2.2) and is shipped with the clock freqeuncy divided by 8 (§6.4.2), therefore the 8-bit timer register will overflow ~4688 times per second. Using an 8-bit variable to count those would itself overflow 18 times per second, so we’d need to use a 16-bit variable instead. That gets us into the human timescale, but 65536/4688 gives us a maximum flash time of ~13 seconds. It might work, but there’s a yet more elegant way…
An alternative is to prescale the timer. This has the effect of using 1 of every n clock ticks to increment the timer counter (§12.1). You can choose from a number of slowdown factors, all of them are powers of two, and all are listed in the datasheet in §11.9.2, table 11-9. The slowest rate we can make the timer increment is at 1/1024th the rate of the main system clock (by setting
CS02 and CS00 bits to 1 in the TCCR0B register).
If prescaling by x1024, the timer register gets incremented at 1.2MHz/1024, i.e. ~1172 times per second, and thus overflows 4.6 times per second. We could use an 8-bit variable to count the overflows and get a maximum of just under 56 seconds for that one little
uint. Sounds better to me.
Here’s a little pseudocode to encapsulate this so far:
ISR(timer_overflow_vector) {
   if (timer_overflow_count > 5) {   // a timer overflow occurs 4.6 times per second
      toggle_led();
      reset_timer_overflow_count();
   }
}

main() {
   initialize_io_port();
   prescale_timer();
   enable_timer_overflow_interrupt();

   while(1) {
      // let ISR handle the LED forever
   }
}
Some of this is gravy, so let’s fill those in with more realistic code:
volatile int timer_overflow_count = 0;

ISR(timer_overflow_vector) {      // TODO
   if (++timer_overflow_count > 5) {   // a timer overflow occurs 4.6 times per second
      // Toggle Port B pin 4 output state
      PORTB ^= 1<<PB4;
      timer_overflow_count = 0;
   }
}

int main(void) {
   // Set up Port B pin 4 mode to output
    DDRB = 1<<DDB4;

   prescale_timer();   // TODO
   enable_timer_overflow_interrupt();   // TODO

   while(1) {
      // let ISR handle the LED forever
   }
}
A little insight from avr-libc helps with the interrupts. By including
avr/interrupt.h, the ATtiny13’s Timer/Counter0 Overflow is exposed through the TIM0_OVF_vect interrupt vector. Thus:#include <avr/interrupt.h>
volatile int timer_overflow_count = 0;
ISR(TIM0_OVF_vect) {
if (++timer_overflow_count > 5) { // a timer overflow occurs 4.6 times per second
// Toggle Port B pin 4 output state
PORTB ^= 1<<PB4;
timer_overflow_count = 0;
}
}
int main(void) {
// Set up Port B pin 4 mode to output
DDRB = 1<<DDB4;
prescale_timer(); // TODO
enable_timer_overflow_interrupt(); // TODO
while(1) {
// let ISR handle the LED forever
}
}
Prescaling the timer is straightforward and straight from the datasheet:
TCCR0B |= (1<<CS02) | (1<<CS00). Setting up the timer overflow interrupt was also defined in the datasheet: TIMSK0 |=1<<TOIE0, and the sei instruction has a helpful sei() macro defined in avr/interrupt.h. Consolidating for our final code:#include <avr/interrupt.h>
volatile int timer_overflow_count = 0;
ISR(TIM0_OVF_vect) {
if (++timer_overflow_count > 5) { // a timer overflow occurs 4.6 times per second
// Toggle Port B pin 4 output state
PORTB ^= 1<<PB4;
timer_overflow_count = 0;
}
}
int main(void) {
// Set up Port B pin 4 mode to output
DDRB = 1<<DDB4;
// prescale timer to 1/1024th the clock rate
TCCR0B |= (1<<CS02) | (1<<CS00);
// enable timer overflow interrupt
TIMSK0 |=1<<TOIE0;
sei();
while(1) {
// let ISR handle the LED forever
}
}
References/Acknowledgements: I have to point out the complete awesomeness and of Dean’s Newbie’s Guide to AVR Interrupts on http://www.avrfreaks.net. It’s awesome. If you want a great explanation of interrupts, go there and read his tut.
Part 3 - Low Power Mode
This is the final part of three in attempting to explain how to make the ATtiny13 flash a LED.
- Part 2: Using timer interrupts
- Part 3: Low power mode
In previous posts we’ve looked at creating a simple LED flasher circuit for the ATtiny, a first-pass program for the ATtiny using delays, and a second-pass implementation exploiting timer overflows resulting in a simpler program. In this article I will explore the power saving modes on the ATtiny13 as an example of how to minimize the power consumption of your circuit. If your ATTtiny13-, ATtiny80-, or even ATmega-based circuit relies on battery power you will be able to significantly improve the battery life by using the chips’ power saving modes.
Overview
Looking at the first page of the datasheet you see it lists “Low Power Idle, ADC Noise Reduction, and Power-down Modes”. Also looking at the modules list in the avr-libc documentation there’s an entry for “<avr/sleep.h>: Power Management and Sleep Modes”. Starting with example code from the latter, putting the device to sleep doesn’t look very hard:
#include <avr/sleep.h>
...
set_sleep_mode(<mode>);
sleep_mode();
Then immediately following is this note: “[…] unless your purpose is to completely lock the CPU (until a hardware reset), interrupts need to be enabled before going to sleep.”
So here are my questions: What are the sleep modes and what do they do? What interrupt vector(s) are available and how do I enable them?
In the datasheet, §7 covers the sleep modes. Right at the top, Table 7-1 summarizes which clocks and oscillators are active, and how the device can be awaken from each of the three supported sleep modes. Looking at §7.1.1-3, the lowest power consumption sleep mode looks like “Power Down Mode” (no surprise), and once in that state it can be awoken by an external interrupt (i.e. a level change on a pin) or through the Watchdog Timer.
Looking at §8.4, the Watchdog timer (WDT) is a separately clocked counter/timer system, capable of generating interrupts which we can use to bring the device out of the Power Down sleep mode. §8.5.2 details the WDT’s register, and in particular Table 8-2 lists how to alter the length of the WDT’s time period.
Implementation
We’ve sen that there’s a way to put the device to sleep, and a way to periodically wake it up. Last time our LED flasher toggled its LED state each time a timer-based interrupt was generated. Let’s do the same thing, except put the device to sleep once the LED state has been toggled. Hopefully this will reduce the power consumption overall, but mainly during the “off” part of the cycle.
Our last implementation using Timer/Counter0 looked like this:
#include <avr/interrupt.h>

volatile int timer_overflow_count = 0;

ISR(TIM0_OVF_vect) {
   if (++timer_overflow_count > 5) {   // a timer overflow occurs 4.6 times per second
      // Toggle Port B pin 4 output state
      PORTB ^= 1<<PB4;
      timer_overflow_count = 0;
   }
}

int main(void) {
   // Set up Port B pin 4 mode to output
    DDRB = 1<<DDB4;

   // prescale timer to 1/1024th the clock rate
   TCCR0B |= (1<<CS02) | (1<<CS00);

   // enable timer overflow interrupt
   TIMSK0 |=1<<TOIE0;
   sei();

   while(1) {
      // let ISR handle the LED forever
   }
}
We need to adjust the timer setup and interrupt we’re using, and add the power mode change. Working on the timer part first, we remove all references to Timer0, and replace them with set up for the WDT. Having read through §8.5.2 it’s clear that operating the WDT is very similar to Timer/Counter0. Setting the
WDTIE bit enables WDT interrupts, and combinations of WDP3, WDP2, WDP1, and WDP0 adjust the prescaling and thus the WDT’s period. Looking at Table 8-2, setting WDP2 and WDP0 gives a 0.5s timer period.
To wrap up replacing the older timer code, we also need to change the interrupt vector we’re using. The documentation for interrupt.h shows that this is called
WDT_vect.
Finally, because we can prescale the timer this low, we can also dispense with our old overflow counter.
#include <avr/interrupt.h>

ISR(WDT_vect) {
   // Toggle Port B pin 4 output state
   PORTB ^= 1<<PB4;
}

int main(void) {
   // Set up Port B pin 4 mode to output
    DDRB = 1<<DDB4;

   // prescale timer to 0.5s
   WDTCR |= (1<<WDP2) | (1<<WDP0);

   // Enable watchdog timer interrupts
   WDTCR |= (1<<WDTIE);

   sei(); // Enable global interrupts

   for (;;) {
      // Waiting for interrupt...
   }
}
If you set up the circuit and program this into the ATtiny13, the LED should flash on and off with a period of ~1 second, as you would expect. It might be interesting top find out what kind of power savings the sleep modes might give us, so before we add the sleep code let’s measure current drain right now. To make measurements a little easier slow down the flash rate by setting the prescaler to 4 seconds –
WDTCR |= (1<<WDP3); – then set your multimeter to measure current and put in the main power loop somewhere. For me the most convenient way was to break the connection between VCC on the ISP breakout and pin 8 on the ATtiny, and insert the ammeter there. I measured 50mA on the mark (whilst the LED was on), and 2.3mA on the space.
To put the device to sleep, the documentation for sleep.h states that
set_sleep_mode(<mode>);
sleep_mode();
is all there is to it. But what parameter do we pass to
set_sleep_mode to enable Power Down Mode? Since it’s not in this page of the documentation, if you take a look at the code for the header file itself, at line 253 there’s a #define forSLEEP_MODE_PWR_DOWN that’s applicable to ATtiny13s.
We have already set up the WDT to wake the device from sleep when it raises an interrupt, so as soon as the interrupt handler is complete it is safe to go back to sleep. Working this in, our code now looks like:
#include <avr/interrupt.h>
#include <avr/sleep.h>

ISR(WDT_vect) {
   // Toggle Port B pin 4 output state
   PORTB ^= 1<<PB4;
}

int main(void) {
   // Set up Port B pin 4 mode to output
    DDRB = 1<<DDB4;

   // temporarily prescale timer to 4s so we can measure current
   WDTCR |= (1<<WDP3); // (1<<WDP2) | (1<<WDP0);

   // Enable watchdog timer interrupts
   WDTCR |= (1<<WDTIE);

   sei(); // Enable global interrupts

   // Use the Power Down sleep mode
   set_sleep_mode(SLEEP_MODE_PWR_DOWN);

   for (;;) {
      sleep_mode();   // go to sleep and wait for interrupt...
   }
}
Plugging in the ammeter again shows 47mA on the mark and 7µA on the space. These readings (and the previous set) are definitely within range of the typical DC characteristics shown in Table 18-1 in the datasheet. If you were using a CR1632 lithium coin cell rated at 125mAh, using the power down mode might increase battery life from 2.4h to 2.6h. Ok, that’s not fantastic but the huge majority of electron juice is used by the LED. If your circuit was a little more complex and had longer periods of inactivity, using the power down saves you a lot of power. If our LED were on for 1/10th of the time it were off, the battery duration change goes from an increase of 8% with the sleep code to an increase of 55%, which seems well worth it to me.
Комментариев нет:
Отправить комментарий